
Migrating our MySQL database to RDS with just 3 minutes of downtime (step-by-step guide)

Today I’m going to walk you through how we migrated our MySQL database from a self-managed VPS to a fully managed Amazon RDS database.
This was a big step in improving our reliability, because our previous server provider didn’t have the best track record with regards to their uptime.
I’ll cover how we we set up RDS as a replica, and how we switched our Laravel app to the new database with minimal downtime.
Let's get into it!
This guide is also available in video form:
Why we migrated
We were hosting our database on a pretty beefy VPS running MySQL. The server had 64gb of RAM and cost us around $500 monthly.
And this setup worked, but there were problems:
- We had to patch the server manually
- We didn’t have a decent failover
- Setting up a read-replica or a staging server was pretty intensive
- We couldn’t set a maintenance window, so we were at the mercy of the provider’s schedule
- And let me tell you, this one really was painful
- And as our database and our platform grew, this became a massive liability.
So we decided to move to Amazon RDS because it’s fully managed and pretty cost-effective. Things like a standby instance, point-in-time recovery, backups, read replicas etc. are pretty easy to manage on RDS and this lets me sleep soundly at night.
Preparing the migration
Our architecture looked a little something like this:
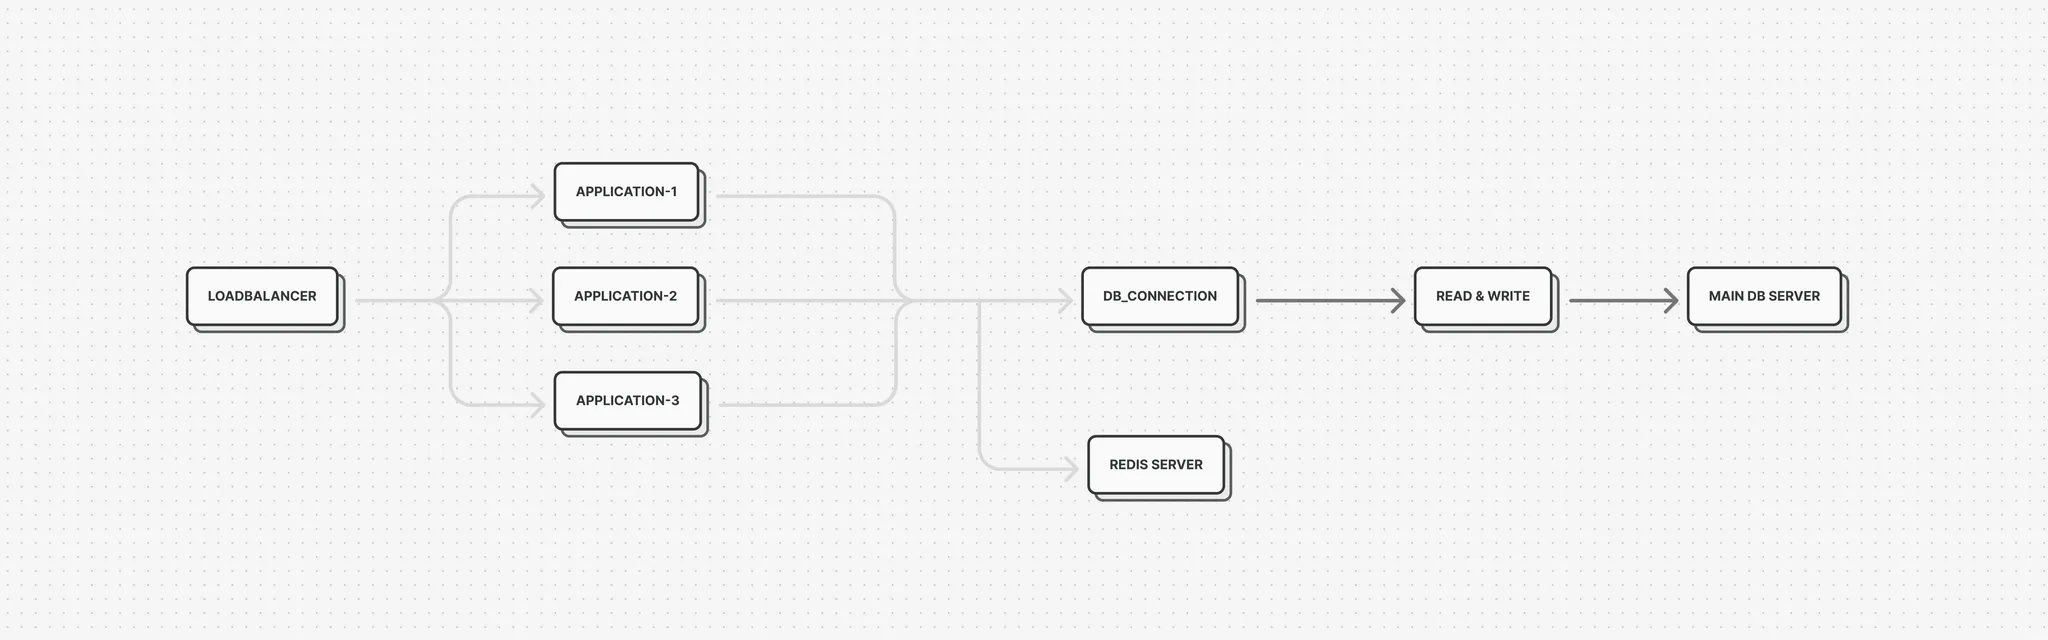
The thought of migrating our database honestly kept me up at night, mainly because I didn’t have any experience. The last time I migrated our database around 7 years prior it was very easy, I just took a database dump, imported it and switched the connection, and this was doable because we only had a handful of users and the import process took around 2 minutes. Since then - our database had grown to around 75gb and on a beefy machine import took around 3 hours.
We cannot afford to go down for 3 hours, so I had to come up with a better approach.
We basically want to start replicating the main database to RDS and the first thing we need to do is actually dump and import the database.
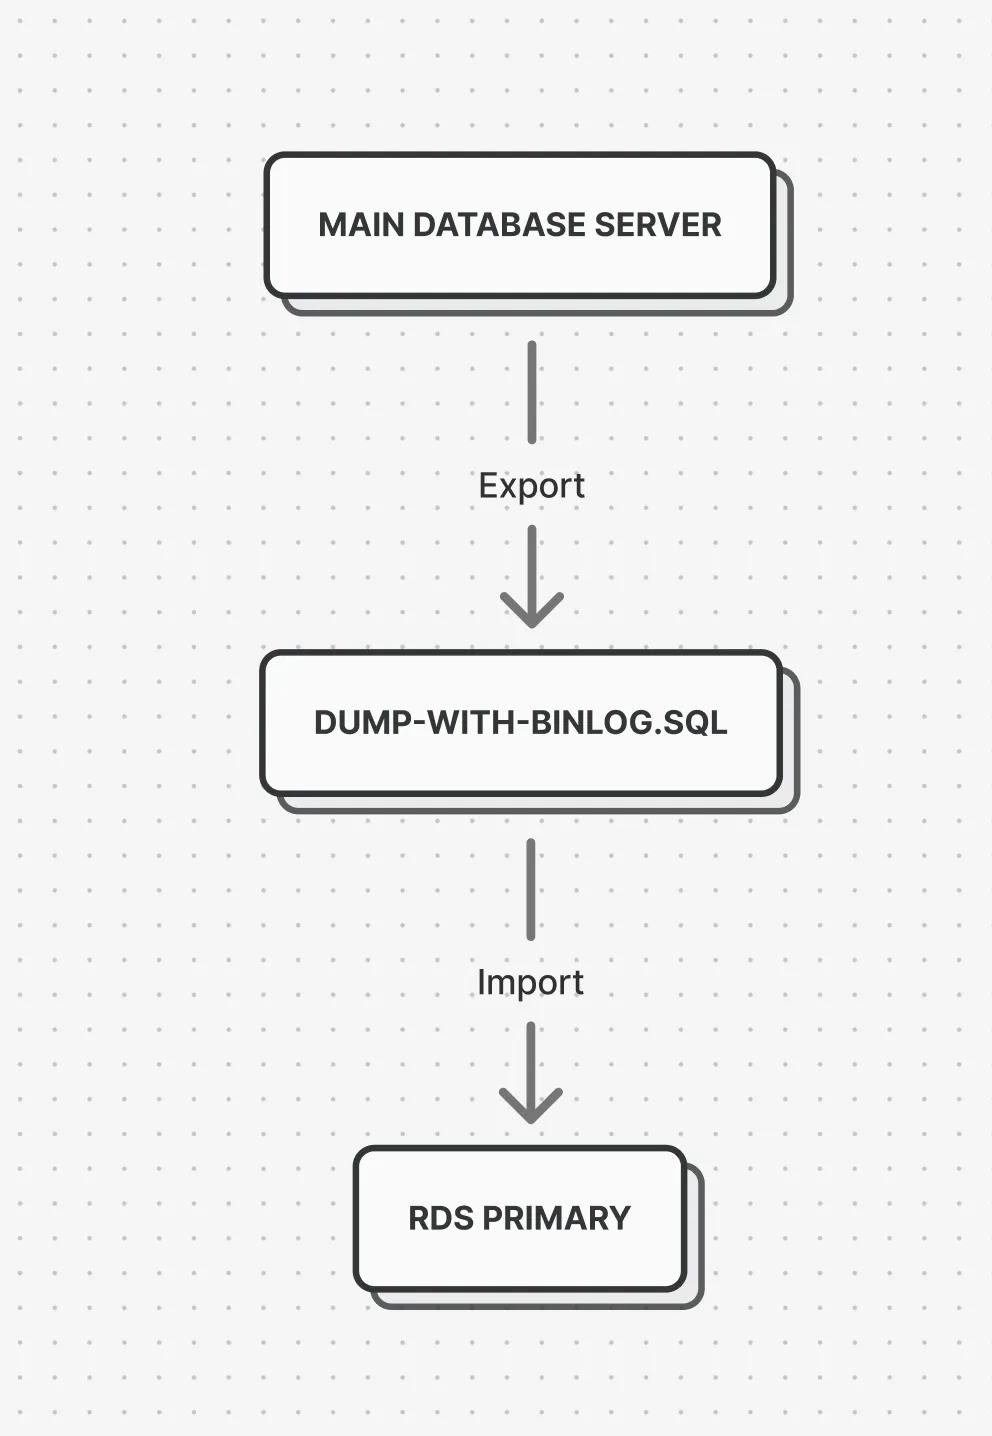
In our database dump we need to register the position and you can do this with gtid’s or binlog positions.
The way you can achieve this is with the following command:
mysqldump -uusr -p --single-transaction --skip-lock-tables --master-data=2 -B database > dump.sql--single-transaction and --skip-lock-tables are often used together for hot backups (no downtime, non-blocking).
--master-data=2 Embeds replication metadata in the dump, used for setting up replication later on. The value ‘2’ means the information is written in the sql file as a comment.
After the dump completed, we can note down the gtid information using this command:
head -n 50 dump.sql
# record 'SET GLOBAL gtid_slave_pos='0-1-365026643';'
Next, I imported this database dump into our RDS database, this was a process that took around 3 hours. Quick tip - using the ‘screen’ command you can run this task in the background on the server, so you don’t need to keep a connection open.
# Create screen
screen -S dbimport

# Import to database
pv dump.sql.gz | gunzip | mysql -uup_usr -p -h abc.eu-central-1.rds.amazonaws.com

# Close screen
(ctrl a+d)

# Reattach screen
screen -ls
screen -r dbimport
After the database import completed, we have to start the replication. If you ever set up a replication on MySQL you probably know you have to call procedures like:
CALL mysql.start_replication;
CALL mysql.stop_replication;
On RDS however, these stored procedure are unavailable and you need to use the rds_ prefixed counterparts because they do some magic behind the scenes:
# so start_replication becomes rds_start_replication
CALL mysql.rds_start_replication;
# and stop_replication becomes rds_stop_replication
CALL mysql.rds_stop_replication;
# Etc.
The first thing we need to do after the database has been imported, is call:
CALL mysql.rds_set_external_master_gtid ('host', 3306, 'user', 'password', '0-1-365026643', 0);
After that, we can start replicating by calling mysql.rds_start_replication;
Finally, to check the status of our replication we can call
CALL mysql.rds_replica_status\G;In my case after a delta of around a week, the replication was caught up in around 6 hours.
An important thing to note is that your source database probably has a limit on how long the binlog files are kept around, so you need to make sure the replication starts within that timeframe.
You can check this as follows on the source database:
SHOW VARIABLES LIKE 'expire_logs_days';
# Or
SHOW VARIABLES LIKE 'binlog_expire_logs_seconds';
Migrating production
One thing I cannot stress enough is that you have to do dry-runs before migrating your production app. You have to run all the possible scenario’s before you actually commit to migrating.
Only after I felt comfortable, I scheduled the migration on a sunday night. Our traffic pattern is pretty predictable, we have around 2 big waves of traffic on our platform, one at lunch and one at dinner. As you can see on the map, after dinner the traffic dies down quickly, and by midnight there are virtually no users left on the platform.
On top of that, mondays are the calmest moment on the platform, so sunday night posed the lowest risk of migrating our app.
That being said, we did announce the scheduled maintenance way in advance to our customers. We have a pretty neat system for announcing system-wide notifications - almost every merchant has a thermal printer connected to one of our products, in which we built a custom notification system.
Whenever we send out a notification, our apps - let’s say our point of sales system for example - will receive this notification and print out the notification on the thermal printer. This way we are 100% sure the merchant reads the notification and is informed about the downtime.
When the maintenance window arrived, the plan was super clear:
- I took out every application server except 1
- I set the entire application in maintenance mode
- I put the database in readonly mode
- Then, I waited until the replica on RDS caught up to the main database (this was nearly instant)
- I updated my .env file and switched the database connection to RDS, and took the application out of maintenance mode.
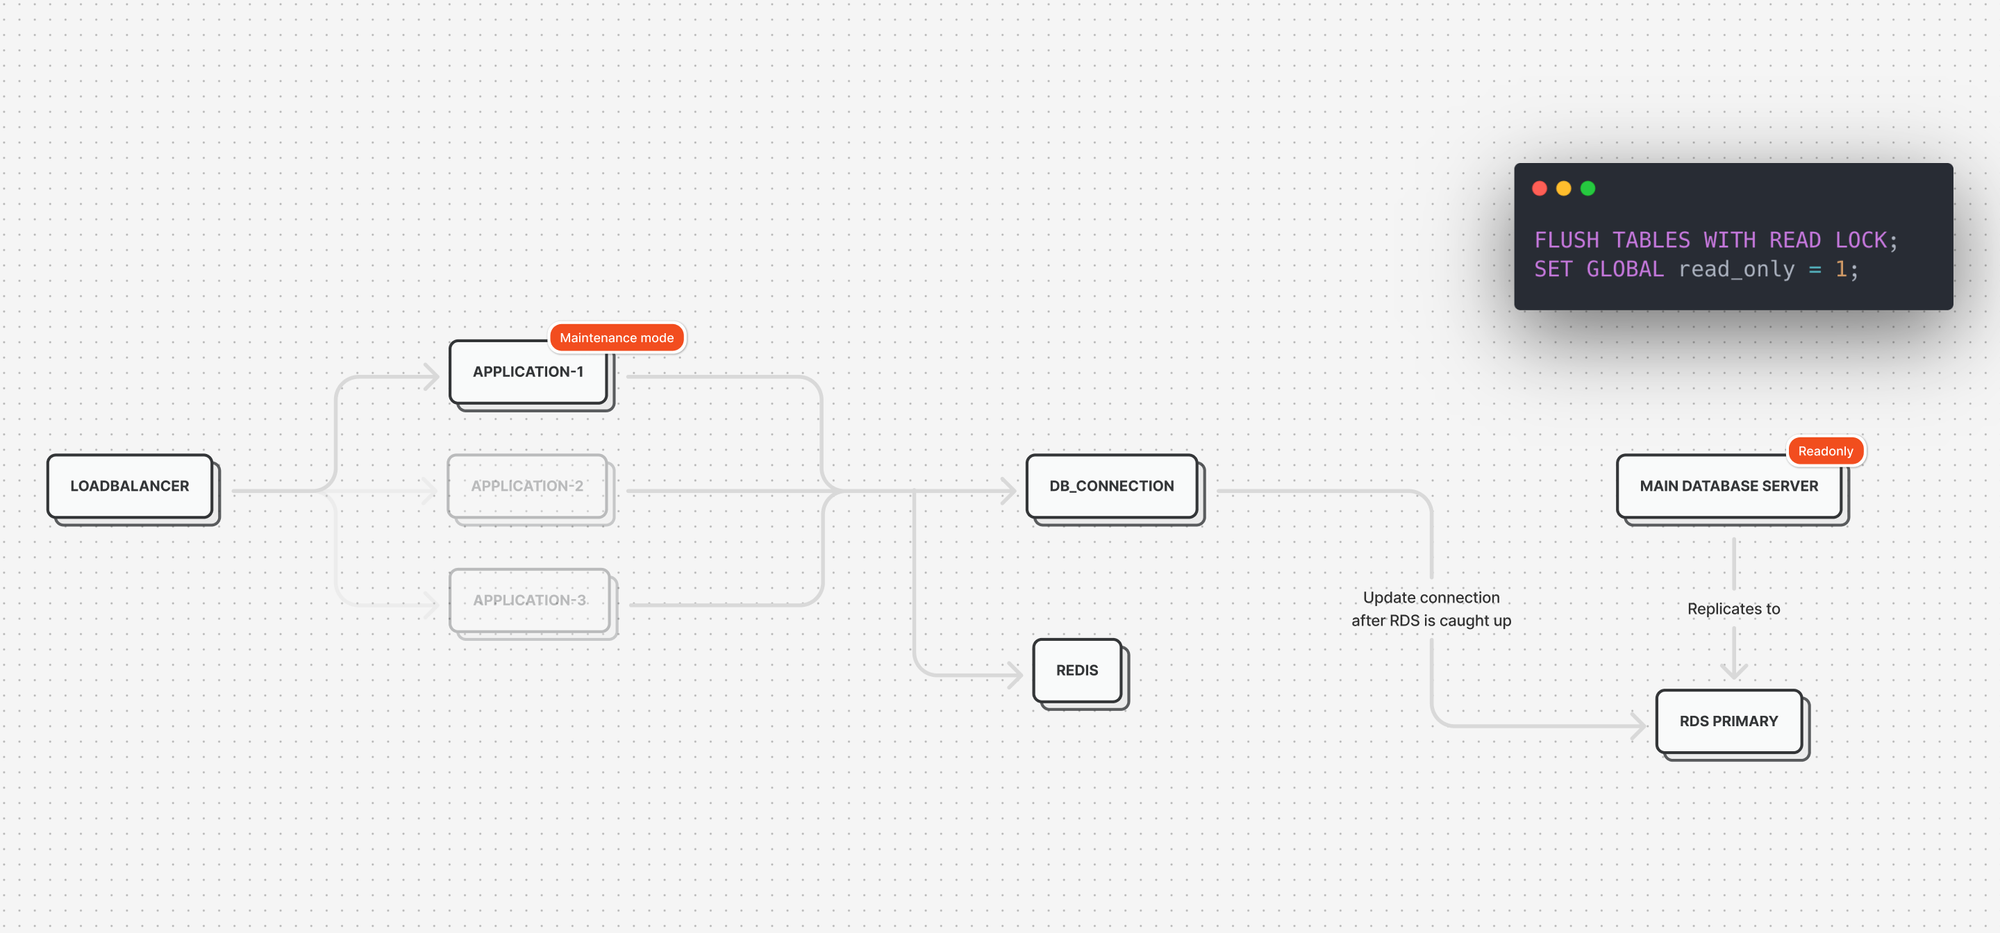
The application was in maintenance mode for around 3 minutes which in hindight could’ve been reduced even further, but I’m not complaining here.
After some manual tests, I finally I updated the 2 other application servers and put them back in the loadbalancing pool, so the application was ready to receive lots and lots of traffic again.
I kept the old database around as an archive for around a month before getting rid of it entirely.
I’m very happy with how the migration turned out, it was an ideal scenario, mainly thanks to the many dry-runs I did. I also documented everything in great detail so I could always fall back to my written docs if something were to go wrong.
If there's one thing you can take away from this guide: dry-runs, dry-runs and more dry-runs 😉
No spam, no sharing to third party. Only you and me.